Good news, the domain ownership verification system has been modified to use shorter string, allowing it to work with the limited 1and1.com DNS system.
Update: If you have a domain with GoDaddy, follow these instructions:
Here's how to setup your 1and1.com domain for Blogger.
Step 1: Get the Blogger settings
- Go to the basic settings of your blog in the Blogger UI.
- Click the "Add a custom domain" link
- Click the checkbox on that new subdomain, select DNS->Edit DNS settings
Select CNAME, enter "ghs.google.com", press OK and go back to the 1and1 Overview dashboard.
- Back on the dashboard, click New -> Create subdomain again
Enter the first element of the second line we saved in the Blogger settings, mine was "mf3relchxuxx", yours will be different. Press OK and go back to the 1and1 Overview dashboard.
- Click the checkbox on that second new subdomain, select DNS->Edit DNS settings
Select CNAME, enter the second section of the second line. Mine is "gv-kgyql46c766bxw.dv.googlehosted.com", yours will be different. Press OK and go back to the 1and1 Overview dashboard.
Update: If you have a domain with GoDaddy, follow these instructions:
Here's how to setup your 1and1.com domain for Blogger.
Step 1: Get the Blogger settings
- Go to the basic settings of your blog in the Blogger UI.
- Click the "Add a custom domain" link
- Click the "Switch to advanced settings" link
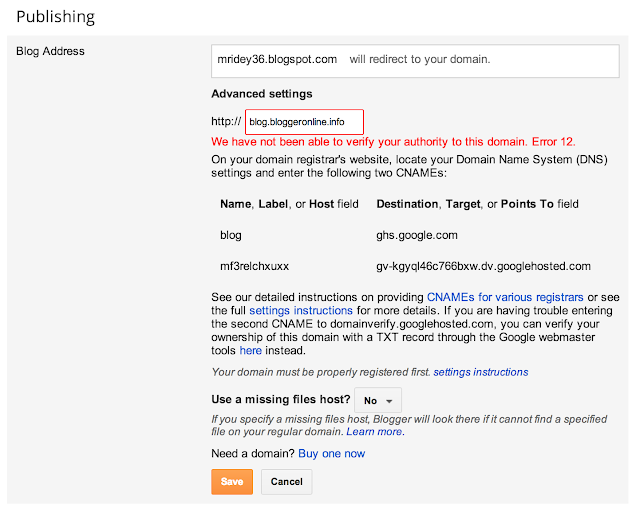
- Enter the subdomain and domain you would like your blog to use. In my case, I purchased domain "bloggeronline.info" and choose to have my blog use "blog.bloggeronline.info". Note that you need to specify a subdomain like "blog" or "www" with your domain name. Then press "Save". It will fail with "Error 12". This is expected.
You will now see two lines displayed that need to be configured on the 1and1 website.
In my case the two lines are:
blog, ghs.goog.com
mf3relchxuxx, gv-kgyql46c766bxw.dv.googlehosted.com
The first line is always the same for everyone, the second line is specific to your own blog and your own account so don't copy my example, it won't work.
Step 2: Go to 1and1.com dashboard
- Go to the 1and1.com website, login, go to domain management
- Click the checkbox on your domain and select DNS -> Edit DNS Settings
Select DNS, Other IP address and enter 216.239.32.21 and press OK and go back to the 1and1 Overview dashboard.
- Back on the dashboard, click New->Create subdomain
Enter "blog" (or www, or any other string you want for your blog, press OK and go back to the 1and1 Overview dashboard.
- Click the checkbox on that new subdomain, select DNS->Edit DNS settings
Select CNAME, enter "ghs.google.com", press OK and go back to the 1and1 Overview dashboard.
- Back on the dashboard, click New -> Create subdomain again
Enter the first element of the second line we saved in the Blogger settings, mine was "mf3relchxuxx", yours will be different. Press OK and go back to the 1and1 Overview dashboard.
- Click the checkbox on that second new subdomain, select DNS->Edit DNS settings
Select CNAME, enter the second section of the second line. Mine is "gv-kgyql46c766bxw.dv.googlehosted.com", yours will be different. Press OK and go back to the 1and1 Overview dashboard.
- Now you should have two subdomains and one domain listed in your dashboard, something like:
Step 3: Wait and wait ...
We need the new settings entered in 1and1.com to be public and visible to Google. This can take up to 48h although usually it's more like 3h.
Step 4: Return to Blogger and apply the custom domain again.
- Go through the steps listed in Step 1. If the domain has been registered correctly, you should no longer get an "Error 12" but instead your domain should be accepted and this screen appear:
- Click the edit link
Make sure you click the "Redirect" checkbox and press Save again. This will make your naked domain (bloggeronline.info in my case) also work for your blog.
This is brand new so if you have problems, please let me know.
Please remember to +1 my post, and reshare it on Google+, Facebook or Twitter, Thanks :)


Post a Comment